KEVIN ANDREW LIPSCOMB - PhotographyMethods
|
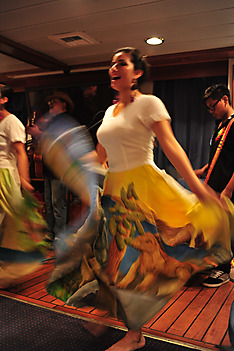
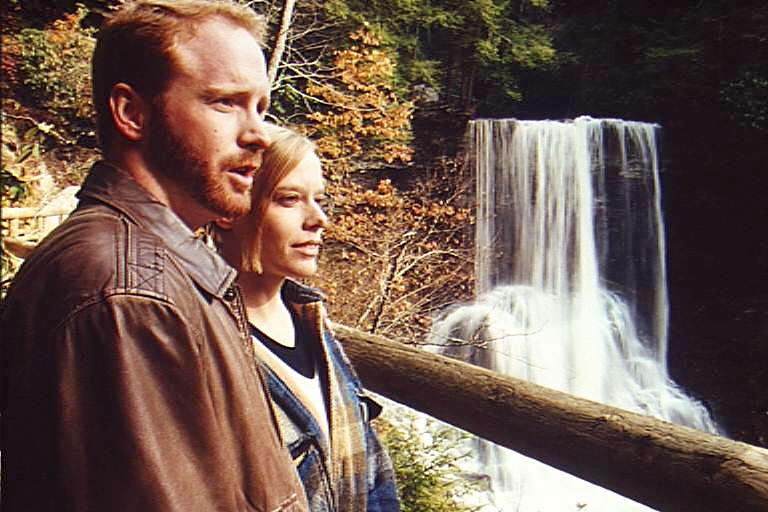
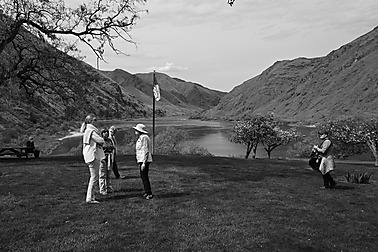
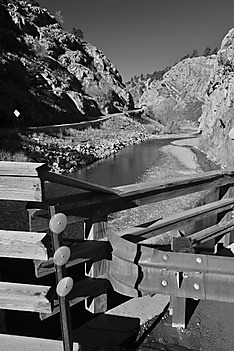
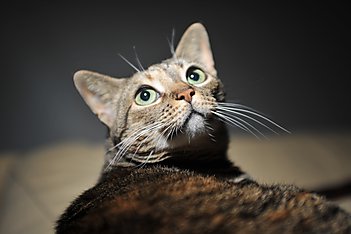
| Seattle Filmworks / Filmworks.com scan | Kodak PhotoCD scan |
 |
 |
SFW's scanning system has a low dynamic range, or ability to differentiate brightness levels, so the image on the left is very contrasty. Kodak's scanning system (called the Picture Imaging Workstation or PIW) has a higher dynamic range (3.2), so the contrast of the PhotoCD image is much truer to life. Also, the maximum resolution of an SFW digital image is 384 kilopixels. The maximum resolution of a Kodak PhotoCD image is 6 megapixels, although the largest I supply online is 1.5 megapixels.
So you get what you pay for.
Digital editing
- It's geared primarily toward graphic artists rather than photographers.
- It's too damn expensive.
- Open the 2048x3072 (6 megapixel or "Base*16") resolution version of an image straight from the PhotoCD.
- If the image is in black & white, choose Transformation / Convert..., then choose 16-bit Black and White. This transformation will reduce the size of your TIFF file (below) from 18Mb to 12Mb.
- Normalize the gray brightness curve (this applies to both color and b&w images):
- Choose Transformation / Gray / Brightness Curve...
- Click the Show Histograms button on the right-hand side of the Brightness Curve control window. (The button looks like a psychiatrist's Rorschach inkblot test.)
- Often, you will want to change the Color Space value to HSL.
- Slide the right arrow at the bottom of the uppermost histogram to the left until it reaches actual highlight data points. If you overdo this, and the histogram starts taking on a notable stair-step appearance, the image will exhibit posterization.
- Click OK.
- Lighten the image further (often, but not always, necessary, for both color & b&w):
- Choose Transformation / Gray / Brightness....
- Choose Preserve: Black and White.
- Often, you will want to change the Color Space value to HSL.
- Slide the scale to the right to lighten the image as desired.
- Click OK.
- For color images, perform a color balancing step:
- Choose Transformation / Color / Balance...
- The Preview window will show you the result of PWP's automatic highlight-based color balance transformation. This is often satisfactory and you can just click OK at this point. Sometimes, though, it's necessary to balance based on midtones rather than highlights. If required, change the Probe to midtone and click on a midtone area in the source image (not the Preview image). Ideally, you'd pick a part of the source image that approximates a standard 18% gray card. For portraits or tricky color temperature situations you might even want to anticipate the performance of this step by shooting a test frame that includes an actual gray card.
- Click OK.
- Perform perspective correction or other transformations on the image.
- Zoom out to 2:1. Choose Tools / Miscellaneous. Choose Tool: Speck Removal and touch up any dust, hair, or scratch marks.
- Save the result as a TIFF file. Why TIFF? Because TIFF is lossless. You'll be basing all of your web conversions and digital prints on this TIFF file, so don't just treat it as a temporary file. If the PhotoCD holds the master scanning results, the TIFF file holds the master edit results. I treat my TIFF files as prime archive material.
 The de facto tool of choice for most digital imaging needs in the commercial world is Adobe Photoshop. I've shied away from PhotoShop, however, because:
Instead, I am very happy with Picture Windows Pro from Digital Light & Color, which is advertised as Serious Software for Serious Photographers. Digital Light & Color was founded by Jonathan Sachs -- the programmer who created the first version of Lotus 1-2-3 back in 1982. My favorite example of PWP's approach to digital image editing is that PWP allows you to express color balancing operations in terms of Kodak Wratten filter designations. As of this writing, PWP goes for about US$90.
My modus operandi with PWP is as follows:
Preparing images for the web
- Along the lines of Philip Greenspun's recommendations, I want to provide a thumbnail image. Greenspun bases his thumbnails on the smallest of the five resolutions available on a PhotoCD (which Kodak refers to as Base/16). For 35mm images, Base/16 amounts to 24 kilopixels. That seemed reasonable to me until I noticed that my eye was much more drawn to his medium-format thumbnails, which are between 36 and 64 kilopixels. I eventually settled on using 54 kilopixels, which would be Base/8 (if PhotoCD imagepacs were to include such a resolution, which they don't). It doesn't matter, because I derive my "Base/8" 35mm thumbnails from the 6 megapixel TIFF files (PhotoCD Base*16 resolution) that I create during the digital editing phase.
- The thumbnail image should link to a medium-size image. It just so happens that the PhotoCD Base resolution (384 kilopixels) fills most modern monitors reasonably well.
- A huge version of the image (with enough resolution to produce a 5x7 print on a Kodak Picture Maker) should also be available online. I offer Base*4 (1.5 megapixels) as my "huge" resolution.
- I want to perform a sharpening operation on all of these images, because scanning inherently introduces some artificial softness into images.
- I want all of these images to be in a format that people's browsers can understand, ie, JPEG.
 This section deals with resizing, sharpening, and format conversion. You can perform all of these operations from within PWP, but in the long run it's simpler and faster to use a script-driven command-line utility instead (especially since you can get the scripts free on web pages like this one).
First, the objectives:
I want to be able to meet these objectives systematically, without the drudgery of repetitive GUI manipulations. ImageMagick to the rescue. ImageMagick is an open-source software suite that includes a command-line utility called convert. The following three invocations of convert will achieve all the above objectives:
   convert -geometry "9.375%" -sharpen "" source-image.tif target-image-i.jpg
   convert -geometry "25%" -sharpen "" source-image.tif target-image-3.jpg
   convert -geometry "50%" -sharpen "" source-image.tif target-image-4.jpg
The suffixes -i, -3, and -4 are my way of indicating the size of the target image. For reasons too involved to go into, my size "i" corresponds to the resolution I've chosen for my thumbnails; my size 3 corresponds to the PhotoCD Base resolution; and my size 4 corresponds to the PhotoCD Base*4 resolution. It won't hurt my feelings if you choose a different naming convention for your image library.
Of course, I also don't want to go through the drudgery of typing the convert commands in over and over, so I put them all in a script and parameterize the filenames. Because I don't want to be constrained to the limitations of DOS scripting, I use Cygwin on my Win98 system to run Bash scripts.
Once the conversions are completed, I FTP the JPEGs to my web site.
Presenting images via a database-backed web site
- A caption
- Technical details
- A link to a huge version of the image
- My email address, in case anyone wants the image at an even higher resolution
- A copyright notice
- A list of keywords associated with the photograph, and a form that the user can use to add their own keywords
 Just as Philip Greenspun does, I present the medium-sized version of each of my photographs on a page that includes several other elements:
Before I arranged to keep my photographs on a database-backed web site, I maintained one simple HTML page for each medium-sized photo presentation. That became very tiresome once I had more than about seven photos to display. Each time I wanted to make some sort of consistent improvement to the medium-sized presentation pages, I had to edit each of those HTML files. I needed the ability to specify an algorithm for creating the medium-sized presentation pages. Then I needed a server that would execute the algorithm on demand to actually generate the medium-sized presentation pages. That way, improvements made to the algorithm would immediate affect the way the server generates all such pages.
Part of any such algorithm would have to be an operation to find the caption and other attributes for the particular photograph being presented. To me, this problem begs for a solution involving a relational database management system, or RDBMS.
Like Mr. Greenspun, I envisioned maintaining a database table, each record of which would contain a photograph's unique ID and its associated attributes (ie, the elements that I place on the medium-sized presentation pages). The SQL statement to create such a table is as follows:
   CREATE TABLE mytablename
      (
      cd_id               varchar(8) NOT NULL,
      frame               tinyint(3) unsigned zerofill DEFAULT '000' NOT NULL,
      huge                char(1) NOT NULL,
      descriptive_text    varchar(255),
      technical_text      varchar(255),
      year_of_copyright   year(4),
      num_times_seen      int(10) unsigned DEFAULT '0',
      associated_keywords mediumtext,
      PRIMARY KEY (cd_id, frame)
      );
I'd need a server that would host this database table, and that would perform database queries on demand.
So for review, I needed to find a web server that:
- Executes algorithms on demand for the sake of presenting dynamic web pages (this capability is referred to as "server-side scripting" in WWW lingo)
- Provides RDBMS services
It turns out that this is a very common combination of requirements. Although I could not find any free providers of such solutions, there are gobs of dotcoms that will take your money in exchange for such services. For my purposes, all such sites exist at some point in a continuum described by the following three dimensions:
- The server-side scripting solution that they provide (Microsoft Active Server Pages [ASP], or open-source, including Perl, PHP, and perhaps others)
- The RDBMS solution that they provide (Microsoft, Oracle, or open-source, including mSQL, MySQL, and perhaps others)
- The raw storage space that they provide (a little, like 5 megabytes, or a lot, like 125 megabytes)
I scoped out the corner of this continuum that exists at the region described by PHP, MySQL, and a lot (125 Mb) of storage space, and the winner was: PHPWebHosting.com. They now get about US$10 of my money per month.
 PHP originally stood for Personal Home Page, but now stands for PHP Hypertext Preprocessor. It's a far simpler language than Perl. It has extremely convenient provisions for performing database queries. PHP and MySQL functionality both reside on the server -- there's nothing to install, build, or configure on your end. You just need to be able to FTP your JPEGs and your web pages to the server end.
It didn't take long for me to develop web pages that contained standard HTML along with embedded PHP statements that performed MySQL queries. That's what each of the '.phtml' files on this site are.
You can also define functions in PHP. Functions are encapsulations of algorithms that you would otherwise find yourself repeating from web page to web page. On my site, I make heavy use of two functions that I wrote. The first is PutLibPhoto($ini,$db_link,). Say I want to drop frame number 008 from Digital Image Volume 2001-003 into a web page named 'article-2.phtml', and I want the photograph to be aligned along the right margin. I do this by embedding this PHP code at the beginning of article-2.phtml...
<? require("f_putlibphoto.phtml"); ?>
...and this PHP statement wherever I want to put the photograph:
<? PutLibPhoto($ini,$db_link,"2001-003","008","right"); ?>
When someone browses to article-2.phtml, the server sees from its 'phtml' extension that it contains PHP code, so the server invokes its PHP interpreter. The PHP interpreter reads in the function (that's what the 'require' statement does), then calls the function whenever it encounters the function call. The function generates the following HTML:
   <a href=http://frompaper2web.com/photolib/present-photo.phtml?div_spec=2001-003&frame_num=008>
   <img border=2 src=div/2001-003/008-i.jpg align=right width=288 height=192>
   </a>
The above tags place the thumbnail image in the page and surround it with a hyperlink to the script that generates the associated medium-sized presentation page for that photograph. If you view the source of the page you are reading right now, you will see that it is peppered with such tag sequences. They were all generated by PHP function calls.
Here's the source to function PutLibPhoto($ini,$db_link,):
   <?
   function PutLibPhoto($ini,$db_link,$div_spec,$frame_num,$alignment = "")
      {
      $image_source_spec = "div/$div_spec/$frame_num-i.jpg";
      echo "<a href=http://frompaper2web.com/photolib/present-photo.phtml?div_spec=
         $div_spec&frame_num=$frame_num>";
      $size = GetImageSize("$image_source_spec");
      echo "<img border=2 src=$image_source_spec align=$alignment $size[3]>";
      echo "</a>";
      }
   ?>
I mentioned that I made heavy use of two PHP functions. The second one is PutLibPhotoRandom($ini,$db_link,):
   <?
   function PutLibPhotoRandom($ini,$db_link,$alignment = "")
      {
      //
      // Connect to the database.
      //
      $db_link = mysqli_connect(localhost,myusername,mypassword,mydatabasename);
      //
      // Create the SQL statement
      //
      $sql = "select * from mytablename order by rand() limit 1";
      //
      // Execute the statement
      //
      $result_set = $db_link->query($sql);
      //
      // Check how many rows were returned
      //
      $rows = mysqli_num_rows($result_set);
      if ((!$result_set) || ($rows != 1))
         {
         echo "<br><b>Random photo retrieval failed.</b><br>";
         }
      else
         {
         //
         // We know exactly one row matched.  Fetch it.
         //
         $field_array = mysqli_fetch_row($result_set);
         //
         // The elements of $field_array contain the fields
         // in the row returned by mysqli_fetch_row().
         //
         $image_source_spec = "div/$field_array[0]/$field_array[1]-i.jpg";
         echo "<a href=http://frompaper2web.com/photolib/present-photo.phtml?div_spec=
            $field_array[0]&frame_num=$field_array[1]>";
         $size = GetImageSize("$image_source_spec");
         echo "<img border=2 src=$image_source_spec align=$alignment $size[3]>";
         echo "</a>";
         }
      }
   ?>
Here's the result of a call to PutLibPhotoRandom($ini,$db_link,). It will probably be different each time you reload this page. I can't tell you which of my photographs will appear here, because the script chooses them at random. Get it?
If you hover your cursor over any of the thumbnails on this site, you'll see a reference to a PHP script called present-photo.phtml in your browser's status bar. The reference includes a list of parameters (the part after the question mark) that identifies the particular photograph that you're pointing to. The present-photo.phtml script generates the "medium-sized presentation pages" that I've been talking about. I can change the medium-sized presentation of all photographs on this site just by changing this one script. Here's its source code:
   <?
   //
   // Validate parameters.  This is an anti-hacker effort.
   //
   if ((sscanf($div_spec,"%1d%1d%1d%1d-%1d%1d%1d%s",&$d11,&$d12,&$d13,&$d14,
         &$d15,&$d16,&$d17,&$d18) != 7)
      or (sscanf($frame_num,"%1d%1d%1d%s",&$d21,&$d22,&$d23,&$d24) != 3))
      {
      echo "Improperly-formatted request";
      exit;
      }
   require_once("f_myhomepageurl.phtml");
   ?>
   <html>
   <head>
   <title>Photo Exhibit [div/<? echo $div_spec ?>/
      <? echo $frame_num ?>]</title>
   </head>

   <body>
   <?
   $size = GetImageSize("div/$div_spec/$frame_num-3.jpg");
   echo "<p align=\"center\"><img border=\"8\" src=\"div/$div_spec/
      $frame_num-3.jpg\" $size[3]></p>";
   ?>
   <table border="0" cellpadding="0" cellspacing="0" width="80%" align="center">
      <tr>
         <td>
            <?
            //
            // Connect to the database.
            //
            $db_link = mysqli_connect(localhost,myusername,mypassword,mydatabasename);
            //
            // Create and execute the SQL statement to increment the hit count.
            //
            $sql = "update low_priority mytablename
               set num_times_seen = num_times_seen + 1
               where cd_id = \"$div_spec\" and frame = \"$frame_num\"";
            $db_link->query($sql);
            //
            // Create the SQL statement to retrieve the row.
            //
            $sql = "select huge, descriptive_text, technical_text, year_of_copyright,
               num_times_seen, associated_keywords from mytablename
               where cd_id = \"$div_spec\" and frame = \"$frame_num\"";
            //
            // Execute the statement
            //
            $result_set = $db_link->query($sql);
            //
            // Check how many rows were returned
            //
            $rows = mysqli_num_rows($result_set);
            if ((!$result_set) || ($rows != 1))
               {
               //
               // No connection or no rows returned, so print an error
               //
               echo "<p>Could not find a unique set of details for photograph
                  div/$div_spec/$frame_num.</p>";
               echo "<p><a href=\"" . MyHomePageUrl() . "\">Kevin Andrew
                  Lipscomb </a> - <a href=\"index.phtml\">Photographs</a>
                  </p>";
               }
            else
               {
               //
               // We know exactly one row matched.  Fetch it.
               //
               $field_array = mysqli_fetch_array($result_set);
               extract($field_array);
                  //
                  // Sets up column-named variables:
                  // $huge, $descriptive_text, $technical_text,
                  // $year_of_copyright, $num_times_seen, $associated_keywords
                  //
               echo "<p align=center><i><b>$descriptive_text</b>
                  </i></p>";
               echo "<p align=center>$technical_text</p>";
               echo "<small><ul>";
               if ($huge == "Y")
                  {
                  echo "<li>Also available online as a <a href=\"div/$div_spec/
                     $frame_num-4.jpg\">1.5 megapixel JPEG</a> (recommended for
                     desktop wallpaper or screen-saver use).";
                  echo "<li><a href=\"mailto:kevin.lipscomb@kvrs.org\">Email
                     me</a> about conventional prints or digital resolutions up to
                     6 megapixels.";
                  }
               if ($num_times_seen == 1)
                  {
                  echo "<li>Viewed 1 time.";
                  }
               else
                  {
                  echo "<li>Viewed $num_times_seen times.";
                  }
               echo "<li>This and <a href=\"index.phtml\">other
                  photographs</a> copyright $year_of_copyright <a href=\""
                  . MyHomePageUrl() . "\">Kevin Andrew Lipscomb</a>";
               echo "<li>To improve searchability, the following keywords are also
                  associated with this photograph.  If you can think of other applicable
                  words that aren't already in the caption or the technical details,
                  please enter them in the field at the bottom of this page.<br><br>";
               echo "<i>$associated_keywords</i><br><br>";
               echo "<form action=add-keywords.phtml?div_spec=$cd_id&frame_num=$frame method=post>\n";
               echo "   <input name=more_keywords type=text>\n";
               echo "   <input type=submit value=\"Add keywords\">\n";
               echo "</form>\n";
               echo "</ul></small>";
               }
            ?>
         </td>
      </tr>
   </table>
   </body>
   </html>
Note how the source code switches back and forth between regular HTML and PHP code. You can think of PHP as a language that allows you to create custom HTML tags.
Printing
 I am no longer the guy to give advice when it comes to conventional (darkroom) printing. In the early 80's, I did my own black & white darkroom work, but no longer. Then again, who does? I'm not a fountain of knowledge about digital printing, either, but here goes...
Halftone (ie, dot-matrix, ink jet, laser) printers are not "continuous tone" rendering devices like your monitor is. They can not vary the intensity of the dots they print. Dye sublimation printers are continuous tone rendering devices (they can vary the intensity of the pixels they print, like your monitor), and their output can rival that of conventional darkrooms. "Dye sub" prints were once considered to have poor archival qualities, but Kodak in particular claims to have licked that problem.
Consumer dye sub printers are just starting to scoot in under the US$1000 mark, but that's still plenty expensive to most folks. Until you can afford a dye sub printer of your own, consider using one of the Kodak Picture Maker kiosks at your local photo store, Kmart, or Wal-Mart. That's what I do, to the tune of about US$10 per 8"x12" sheet of photo paper. The system has a flatbed scanner, a CD drive, a floppy drive, a slide scanner, and a digital media card reader as its input devices; it has a Kodak 86xx dye sub printer as its output device; and it has consumer-oriented photo editing software. It understands JPEG, Kodak PhotoCD, and Flash Pix CD formats.
Follow the steps above to transform your photographs into high-resolution JPEG files. Then copy your JPEGs onto floppy or compact disks and carry those disks to the Kodak Picture Maker. When proceeding in this manner, avoid using the Picture Maker's digital editing features -- such changes are better done during the "master edit" phase described above.
The 1.5 megapixel versions of the photographs on my site are suitable for enlargments up to 5x7 inches on the Kodak Picture Maker. To make 8x10s or 8x12s, you'll need a 6 megapixel JPEG. Reasonable file sizes for 6 megapixel JPEGs range from about 500 kilobytes (at JPEG quality factor 75) to 18 megabytes (at JPEG quality factor 100). I've had superb results at JPEG quality factor 92, which gives you a file that will fit (just barely) on a 1.44Mb floppy disk. Using the "master edit" TIFF file derived previously, the following command will fill an empty floppy to the brim so that you can carry it to the Picture Maker for a beautiful 8x10 or 8x12 print:
convert -quality "92%" -sharpen "" source-file.tif target-file.jpg
The Picture Maker software will still complain that you should not be printing the image any larger than 5x7 inches, but don't believe it. Just press "Continue" when you see that warning. You'll be glad you did.
Read Philip Greenspun's Labs article if you are interested in finding good darkroom labs.
Framing
 First, read Phil Greenspun's Framing Suggestions.
My habit, which I've found to be economic and consistent, is to order OneStep Frame Kits from Light Impressions. Each kit includes everything you need but the print itself, and all of the materials are of archival quality. For an 11x14 inch Formal Florentine Black frame kit (to display an 8x10 inch print), I shell out US$29.95. The catalog number is 10306.
Storage
- Propylene box with 1" O-ring, catalog # 9443, US$12.95
- PhotoGuard pages, catalog #s 9705, 7713, US$11.95
- Laser Labels, catalog # 9332, US$12.95
- Polyethylene Slide Preserver pages, 50/package, catalog # 2599, US$19.95
- HD PolyChron Negative and Film Storage Pages, 50/package, catalog # 7577, US$21.95
- FoldLock Sleeves for Film and Negatives, 50/package, catalog # 5650, US$4.45
- Roll number
- Initial load date
- Type of film
- Film speed
- Number of frames on roll
I made my choices after reading Phil Greenspun's article on Storing Slides, Negatives, and Photos.
I order plastic Pendaflex Ironside hanging folders from Boise Cascade Office Products (catalog # F572525, 25/box, US$21.80). I get other supplies from Light Impressions, including:
When you have film scanned at processing time, you (had better) always receive the results of such scans on some form of digital media (CD, floppy disk, email attachments, etc). I use the term Digital Image Volume (DIV) to refer to such media. In such cases, I store the processed film, the DIV, and the index prints in the same hanging file.
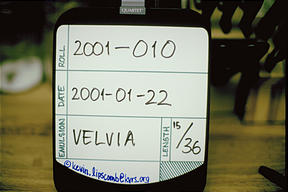 To track the particular rolls of film that I shoot, I try to include a "take card" image on each roll. My home-made take card is a small dry-erase board with an 18% gray card on the back. I used a Sharpie permanent marker to draw a template on the take card with the following fields:
I fill the fields in with an erasable marker, then I take a picture of the card. This way, I can positively associate a particular exposure note with a particular frame on a particular roll of film. If I have that roll scanned at processing time, then the image of the take card positively associates the roll with a particular Digital Image Volume. When I load an image on my web site, I can track back to the roll, frame, and exposure note that correspond to that image. I enter the exposure note in the caption and technical detail fields in my database table, and voila -- people browsing my images get fully annotated descriptions.